Have you installed a weathering steel garden edging only to find it wobbles with the slightest push? Are the joints between the panels uneven, with noticeable unevenness along curved sections?
Such issues are often not caused by an insufficient number of ground pegs, but rather by a mismatch between the edging design, the fixing components and the soil conditions on site.
There are three main fixing systems for weathering steel edging: integrated spike fixtures, standalone ground peg assemblies and bolted connection plate structures. Installation methods from different systems must not be mixed.
Whether you are a private garden owner, a landscaping contractor or a bulk purchaser, clarifying the fixing solution in advance can prevent subsequent displacement and misaligned joints, thereby saving on rework costs.
This article provides a detailed explanation of the selection of fixing systems for metal garden edging, step-by-step installation, handling of curved corners, and solutions for common faults, whilst also summarising key points for procurement checks.
The 3 Main Fixing Systems for Weathering Steel Edging
1. Integrated Spike Edging
The spikes and edging panels are moulded as a single unit and anchored by inserting them directly into the ground.
During installation, position the panels along the marked line, tap them gently into the ground, and use the built-in locking mechanism to join the panels together.
This method is quick to install and is suitable for separating lawns and low flowerbeds. When tapping, it is recommended to place a wooden block beneath the top edge to protect it; do not strike the steel panel directly to prevent deformation or damage to the locking mechanism.
Separate Ground Pegs + Bracket System
The edging panels do not feature integrated spikes and are used in conjunction with separate ground pegs, sleeves, clips and locking screws.
Ground pegs can be driven into the ground first, followed by the attachment of the corten steel garden borders, allowing for on-site fine-tuning of height and straightness.
⚠️ Note: Ground peg dimensions and connection points vary by model; accessories are not interchangeable. Please confirm the compatible parts list before placing your order.
Bolt-Connected Panel Joining System
Individual panels are securely joined using connecting plates and bolts to ensure the entire boundary runs straight.
Suitable for long-distance boundaries and commercial landscaping projects; the preferred choice for scenarios requiring high seam flatness.
What Tools and Fixings Do You Need?
Tools are divided into two categories: those for marking out and measuring, and product-specific accessories. There is no need to purchase all the tools at once; simply prepare the tools required for your chosen installation method.
– Basic marking-out tools: tape measure, string, spirit level, marking tools for marking straight lines, corners and curved sections.
– Installation tools: rubber mallet, wooden shims, screwdriver, Allen key.
-Complementary fixings: Original manufacturer’s ground anchors, connecting plates, locking screws, corner fittings and end caps.
When purchasing in bulk from Supplier B, it is essential to confirm at the quotation stage whether accessories are included, and whether corner fittings and spare screws are priced separately, to avoid work being halted midway through installation due to missing parts.
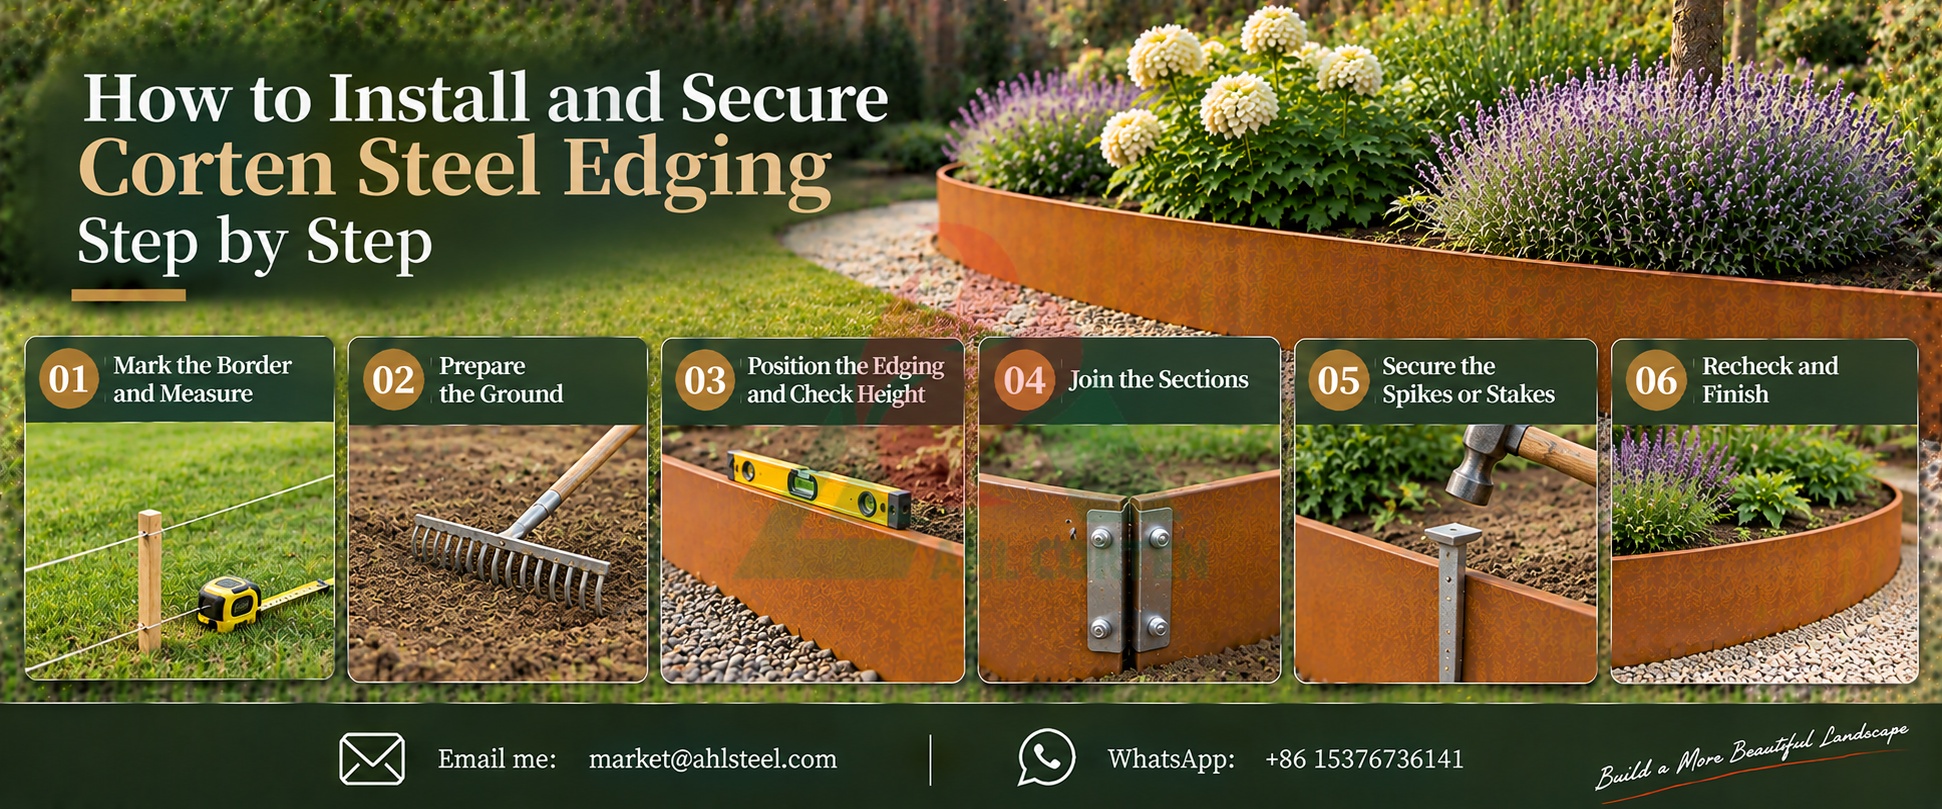
How to Install and Secure Corten Steel Edging Step by Step
Step 1 — Mark the Border and Measure the Layout
First, draw out the complete layout: mark all straight sections, curved sections, corners and end positions.
Pay particular attention to lap joints: the lap will occupy part of the sheet’s length, so the nominal length of a single sheet ≠ the effective coverage length; when calculating material requirements, ensure the overlap allowance is factored in.
For large-scale projects, it is advisable to produce a layout drawing, specifying the total length, the radius of curved sections and the exposed height, to avoid material shortages or unnecessary offcuts.
Step 2 — Prepare the Ground
Clear obstacles such as stones, tree roots and weeds along the marked lines.
In areas with hard soil, loosen the ground in advance; do not forcefully hammer in the spikes, as this may bend them or deform the panels.
Soft or uneven ground must be assessed in advance; where necessary, the reinforcement plan should be revised, as failure to do so may result in settlement or tilting at a later stage.
Step 3 — Position the Edging and Check the Height
Lay out the edging panels along the marked lines and check their orientation.
Distinguish between the total height of the panels and the finished exposed height; the length of the buried section is determined by the product design and must not be set arbitrarily based on experience.
Carry out a thorough inspection throughout the process: ensure the edge lines run consistently, the exposed height is uniform, and the joints are arranged reasonably. Confirm that the structure is intended solely to define boundaries and not to bear significant earth-retaining pressures.
Step 4 — Join the Sections Using the Correct Connectors
The joining method depends on the product: built-in tongue-and-groove joints, specialised connecting plates, bolted fastenings, or manufacturer-supplied corner fittings.
Ensure that the interlocking mechanisms or bolts are fully secured; simply stacking the steel plates will result in insufficient joint strength and may lead to misalignment later on.
During long-distance installation, align and calibrate each section as it is joined; even minor errors will become very noticeable as they accumulate.
Step 5 — Secure the Spikes or Stakes
Once the sections are aligned, proceed to secure them in place.
Integrated spike type: Place wooden shims underneath and tap the spike slowly into the ground;
Separate ground pegs: Align with the pre-drilled holes, secure the panels in place, and then tighten the fasteners.
There is no standard spacing for ground pegs, as this is influenced by the height and thickness of the panels, soil conditions, curvature and lateral pressure. In cases involving soft soil or retaining walls for flower beds, denser and more robust anchoring is required; confirm the layout plan with the supplier in advance.
Step 6 — Recheck Alignment and Finish the Installation
Carry out a self-inspection along the entire length: ensure the edges are straight, joints are flush, anchoring is secure, there is no wobbling, and the exposed height is uniform.
Backfill with soil and gravel, compacting in layers, and clear away construction waste. For commercial projects, it is recommended to retain drawings and product specifications to facilitate future maintenance and replacement of components.
Want the Latest Catalog for Corten Steel Edgings? Contact Us!
How Do You Install Corten Steel Edging Along Curves and Around Corners?
Curved edging can create smooth boundaries for flowerbeds, tree pits and garden paths, but compared to straight lines, it places greater demands on joining and anchoring.
Shape Curves Within the Product’s Limits
The flexible version of corten steel edging supports gentle on-site bending, but is subject to a minimum bending radius.
Rigid sheets must not be forcibly bent, as this will result in creases and torn interlocking joints. For arcs with a small radius, it is preferable to use factory-preformed components.
Mark out the line before bending, shape the edging gradually, adjusting and aligning the seams as you go, and only secure it permanently once everything is in place.
Use Suitable Corner and Joining Details
There are several methods for creating corners: on-site bending (flexible type only), standalone corner fittings, factory-prefabricated corner components, and custom-made special-shaped components.
If a project involves multiple small-radius arcs or continuous corners, provide the supplier with drawings in advance to confirm whether standard components will suffice or if custom-made parts are required.
Keep Joints Aligned Along the Curve
The most common flaw in curved installations is stiff, jarring seams that appear angular.
Plan the seam locations in advance; avoid placing joints at inflection points in the curve;
Prioritise the use of matching curved connectors;
Do not rely solely on adding more ground anchors to correct misaligned seams.
How Do You Fix Loose, Leaning or Sunken Corten Steel Edging?
When problems arise with the edging, prioritise identifying the root cause rather than blindly adding ground anchors.
– Loose or wobbly: Check whether the ground anchors are fully embedded in the soil, whether the soil is loose, and whether the fittings are of the correct type. Where the ground is soft, simply adding more ground anchors is unlikely to provide a permanent solution.
– Inward/Outward Tilt: Determine whether the structure is bearing soil pressure exceeding its design capacity; standard partition steel landscape edging must not be used for high retaining structures. First, relieve the lateral pressure, reinforce the support, and then realign the structure.
– Joint Separation: Caused by disengaged locking tongues, missing screws or deformed connecting plates. Replace with original manufacturer’s parts of the same specification; do not use random substitutes.
– Settlement of the edging: Insufficient base support or settlement of backfill soil. Lift the panels, treat the soft soil layer beneath, and implement additional support measures.
– Impact damage to the top edge: Mostly caused by rough handling. Minor surface rust is normal; for severe deformation, contact the supplier to assess whether replacement is required.
Common Corten Steel Edging Installation Mistakes to Avoid
- Using installation instructions for a different model; fixing structures are not interchangeable between different designs;
- Confusing the total height of the panels with the exposed height, resulting in incorrect burial depth;
- Omitting the overlap allowance when calculating lengths, leading to insufficient material;
- Failing to fully tighten interlocking joints or screws, resulting in loose connections;
- Striking panels forcefully against hard ground, damaging the spikes and panels;
- Mixing and matching incompatible ground pegs or connecting plates;
- Ignoring variations in soil conditions and failing to provide additional reinforcement for soft soil or slopes;
- Using decorative partition edging as a retaining wall to bear the earth pressure from significant elevation differences.
Request Rusted Steel Edging with Matching Fixings from AHL
Choosing a reliable steel garden edging supplier is important for maintaining consistent product quality, installation compatibility and project delivery.
AHL provides corten steel landscaping products for customers looking for practical edging solutions for gardens, pathways, commercial landscapes and outdoor projects.
For buyers sourcing edging in bulk, the focus should be on selecting the right product specifications and confirming the complete fixing arrangement before production or shipment.
FAQs About Fixing Corten Steel Edging
1. How Is Corten Edging Fixed into the Ground?
Corten steel edging is generally fixed using integrated spikes or separate ground stakes. Some products also use dedicated brackets, sleeves or locking components. The correct method depends on the edging profile and the manufacturer’s installation instructions.
2. Does All Metal Garden Edging Need Separate Stakes?
No. Some Corten steel edging products have integrated spikes that extend into the soil, while others require independent ground stakes. Check the product specification before ordering to determine which fixing components are required.
3. How Far Apart Should Edging Stakes Be?
There is no universal stake spacing for all Corten steel edging products. The recommended spacing depends on the edging height, thickness, fixing design, soil conditions and border layout. Follow the manufacturer’s installation guidance or request project-specific advice.
4. How Deep Should Weathering Steel Edging Be Installed?
The installation depth depends on the total height of the edging, the required exposed height and the design of the fixing system. Check the product dimensions and installation drawings rather than applying a standard burial depth to every model.
5. How Do You Join Two Sections of Corten Steel Edging?
Adjacent sections can be connected using integrated locking tabs, overlapping joints, separate joining plates or bolts. Ensure the selected connectors are compatible with the edging profile and that all designated locking points are properly secured.
6. Can Corten Steel Edging Be Installed on Curves?
Yes, provided the selected product is suitable for curved installation. Flexible edging may allow gentle on-site bending, while tighter or more precise curves may require machine-rolled or factory-preformed sections. Always confirm the permitted bending radius and forming method.
7. How Do You Secure Edging in Soft Ground?
Start by assessing the soil condition and the stability required for the application. Depending on the product, additional stakes or a suitable support arrangement may be necessary. Consult the supplier before changing the original fixing system.
8. How Do You Fix Loose or Leaning Garden Edging?
First, inspect the soil, fixing components, joints and surrounding support. Reposition the affected section and reinstall compatible fixings where appropriate. If the ground is unstable or the connectors are damaged, correct the underlying problem or replace the unsuitable components rather than simply adding more stakes.
Want the Latest Catalog for Corten Steel Edgings? Contact Us!